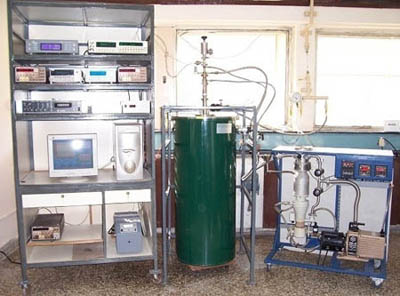

Material characterization at cryogenic temperatures is essential to (i) obtain fundamental understanding of material behavior and (ii) qualify them for applications where sub-ambient (cryogenic) temperatures are encountered. Specific heat data of a material at cryogenic temperatures is very useful information in this regard. Researchers and technologists require this data while developing cryogenic systems.
The present technology pertains to indigenous development of a automated low temperature (10 – 300 K) semi-adiabatic heat pulse calorimeter for measurement of specific heat of small solid samples (sample mass ~ 500 mg to 2 g). Complete design, fabrication, testing and performance assessment of the calorimeter has been established. This equipment is an excellent import substitute to commercial cryogenic calorimeters, which are comparatively very costly and delicate to operate and maintain.
Material characterization at cryogenic temperatures is essential to (i) obtain fundamental understanding of material behavior and (ii) qualify them for applications where sub-ambient (cryogenic) temperatures are encountered. Specific heat data of a material at cryogenic temperatures is very useful information in this regard. Researchers and technologists require this data while developing cryogenic systems. The present technology pertains to indigenous development of a automated low temperature (10 – 300 K) semi-adiabatic heat pulse calorimeter for measurement of specific heat of small solid samples (sample mass ~ 500 mg to 2 g). Complete design, fabrication, testing and performance assessment of the calorimeter has been established. This equipment is an excellent import substitute to commercial cryogenic calorimeters, which are comparatively very costly and delicate to operate and maintain.
Developed calorimeter is based on absolute method of specific heat measurement. In this method, a thermally isolated specimen (having temperature T1) is given a small and finite quantity of heat energy input (ΔQ). Specimen temperature reaches to a modified equilibrium at higher temperature (T2). Resulting temperature increment (ΔT = T2 – T1) is measured using sensitive thermometry. Heat energy normalized to net temperature increment (ΔQ/ΔT) gives the specific heat of specimen at average temperature (Tavg = {T1+T2}/2). Sample temperature is varied from 10 to 300 K and similar heat pulse cycle at pre-defined temperature interval gives the specific heat as a function of temperature. The system has an overall accuracy of ± 2% with similar precision. It can measure small samples (mass ~ 500 mg) and calorimeter operation is fully automated. It is developed with user friendly data acquisition software, which enables the user to optimize experimental parameters as per the need. The system is easy to maintain and is excellent cost effective research equipment for universities, research institutes and research wing of industries.
DETAILED SPECIFICATIONS
| Temperature range of operationr | 10 - 300 K |
|---|---|
| Overall system accuracy | ±2% |
| Overall system precision | ±2% |
| Sample size range | 6-9 mm diameter; 1-2 mm thickness |
| Sample mass range | 500 mg – 2 g |
| Data collection Interval | 0.3 to 1 K |
| Temperature sensor | DT-470 Silicon diode |
| Sample Holder | Oxygen free high conductivity copper |
| Sample Heater | Strain gauge |
| Shield Heater | 25 W Manganin resistive wire |
| Hardware | Standard precision instruments |
| Software | Window based, LabWindows/CVI |
| Communication | GPIB |
| Power requirement | 220-230 VAC, 50 Hz, single phase |
| System dimensions (L x W x H) | 9 feet x 3 feet x 8 feet |
RAW MATERIALS
Most of the raw materials (metals, alloys, sensors and heaters) are locally available from Indian manufacturers. Few precision instruments (current source, nano voltmeters, temperature controllers, etc.) may be procured from manufacturers abroad. However, all these components are easily available.
INFRASTRUCTURE
For fabrication of complete calorimeter probe and peripheral assemblies, access to mechanical workshop is needed. The manufacturer may have this facility (heavy duty lathe machine, metal drilling, precision welding & brazing) at his disposal. Alternatively, fabrication may be outsourced since engineering design of the probe and peripheral components has been established. Apart from this, for fine tuning small components, assembling and testing, a room (20 feet x 20 feet x 10 feet) is required that house common furniture, small lathe machine (jeweler’s lathe), electrical solder ion, multi-meter, etc. For testing the system under cryogenic conditions, access to liquid helium and liquid nitrogen as well as experience in handling these cryogenic liquids is needed.
SPACE
MANPOWER
